


Photoshop の代わりに 無料で使える画像編集ソフト「Gimp」を見つけたので、
スクリプトを実行できるか調べました。
Python が使えるようなので、これでプログラムを書きます。
設定 > フォルダ > プラグイン > プラグイン用フォルダー でフォルダを確認。
/Users/【ユーザー名】/Library/Application Support/GIMP/2.10/plug-ins
/Applications/GIMP-2.10.app/Contents/Resources/lib/gimp/2.0/plug-ins
ここに、Pythonファイル resize_image.py を置く。
以下は、選択したフォルダの中にある pngファイルを、指定した横幅 の jpg ファイルにリサイズするスクリプト
resize_image_dialog.py
#!/usr/bin/env python
# -*- coding: utf-8 -*-
from gimpfu import *
import os, glob
def plugin_main(image, layer, dir_path, max_width):
if (not type(dir_path) == type("") or not len(dir_path)):
gimp.message("フォルダを選択して下さい")
return
for jpg in glob.glob(os.path.join(dir_path, "*.[PpJj][NnPp][GgGg]")):
image2 = pdb.gimp_file_load(jpg, "")
num , ids= pdb.gimp_image_get_layers(image2)
layer2 = gimp.Item.from_id(ids[0])
save_files(image2, layer2, dir_path, max_width)
def save_files(image, layer, output_path):
currentWidth = layer.width
currentHeight = layer.height
newWidth = currentWidth
newHeight = currentHeight
maxw = 500
if (maxw < newWidth):
newWidth = maxw
newHeight = (float(currentHeight) / (float(currentWidth) / newWidth))
set_color_foreground(255,255,255,1.0)
set_color_background(255,255,255,1.0)
layer_bg = add_layer(image, "background",1)
draw_rect(layer_bg, 0, 0, layer.width, layer.height)
layer_join = pdb.gimp_image_merge_down (image,layer,EXPAND_AS_NECESSARY)
pdb.gimp_image_scale(image, newWidth, newHeight)
display_image(image)
save_file(image, layer_join, output_path)
def save_file(image, layer, dir_path):
file_name = image.name.lower()
file_name = file_name.replace('.png', '').replace('.jpg', '')
file_path = dir_path + "/"+ file_name + ".jpg"
pdb.file_jpeg_save(image, layer, file_path, file_path, 0.9, 0, 0, 0, "", 0, 0, 0, 0)
def set_color_background(r, g, b, a):
color = (r, g, b, a)
pdb.gimp_palette_set_background(color)
def set_color_foreground(r, g, b, a):
color = (r, g, b, a)
pdb.gimp_context_set_foreground(color)
def create_image(width, height):
return gimp.Image(width, height, RGB)
def add_layer(image, name, position):
width   = image.width
height  = image.height
type    = RGB_IMAGE
opacity = 100
mode    = NORMAL_MODE
layer = gimp.Layer(image, name, width, height, type, opacity, mode)
# レイヤーを背景色で塗りつぶす(GIMP のデフォルトの挙動に合わせています)
layer.fill(1)
# 画像データの 0 番目の位置にレイヤーを挿入する
# position = 0
image.add_layer(layer, position)
return layer
def draw_pencil_lines(drawable, lines):
pdb.gimp_pencil(drawable, len(lines), lines)
def draw_rect(drawable, x1, y1, x2, y2):
lines = [x1, y1, x2, y1, x2, y2, x1, y2, x1, y1]
draw_pencil_lines(drawable, lines)
def display_image(image):
gimp.Display(image)
register(
"python_fu_resize_image_dialog",
"Image resize",
"Image resize",
"Author",
"Author",
"2019/11/27",
"<Image>/Filters/Languages/Python-Fu/resizeImageDialog",
"RGB*, GRAY*",
[
(PF_DIRNAME, "directory_path", "Open directoryPath", ""),
(PF_INT, "max_width", "Maximum Width", 500),
],
[],
plugin_main)
main()
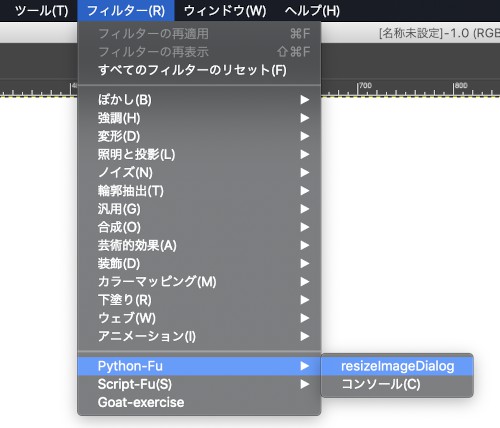
↓こちらのように実行。

- 作者: ソシムデザイン編集部
- 出版社/メーカー: ソシム
- 発売日: 2019/09/04
- メディア: 単行本